More than a few days…

More than a few days have passed since my last posting. What have I been working on? Well, the same stuff.

I’d been getting my a** kicked by a logic gate thingy for two days, and turns out, all I had was two wires transposed – ahh well. Here is a re-post of a thread I started on linear1.org:

As part of my continuing effort to develop LED sensor technology, I’ve been trying to tackle the problem of expansion… My original brute-force method was an army of PIC microcontrollers, discretely controlling individual LEDs. While this method worked and was rather simple from a hardware stand-point, there were several drawbacks. The most ADC ports I was able to use was ten… there are microcontrollers with more than this, however they have certain drawbacks that make them unsuitable for my application. Knowing the limit of 10 leds per slave, to build an array of a useful size, say 3×10, would require three slave microcontrollers. Although not enormously expensive, each mcu costs at minimum $3, which adds up quickly.

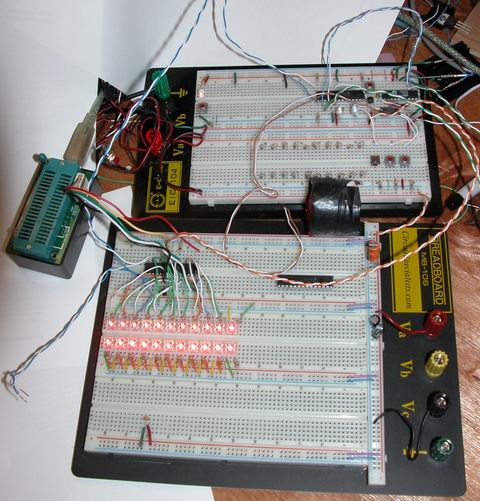
The method I am currently exploring involves linear logic chips, specificly the 74HCT595N 8 bit serial load latching shift register. Here is the idea, and I’ll throw up a schematic shortly. The cost of a 595 for hobby purposes is roughly 75 cents. Even a modest quanity of 20-25 shifts that price down below 50 cents a piece. Far better than the cost of individual microcontrollers.

The 595 is used to source current, driving the anode axis of the array (columns). I fill the register with 1’s, which sets each output as a current source. While filling with 1’s, I clear the bit for the column which contains the LED I want to sample. The 595 holds this state indeffinately, until it is changed by the microcontroller. The microcontroller, which is directly interfacing the cathode axis of the array (rows), then samples each LED in that column by applying a reverse bias charge and then switching to a high-z input for the A2D reading for each row. This is done one bit at a time (each bit equals a row), so neighboring rows are left “on” at are lit, allowing a good amount of light to be reflected into the led currently being read.

This new arrangement allows a single microcontroller to handle a matrix of ‘unlimited’ columns by ten rows (each row needs to be connected directly to the microcontrollers unique tri-state IO port). A 160 pixel array of 16 columns by 10 rows needs only one microcontroller and two shift registers. Of course, the actual size of the array will be determined by how fast the PIC can scan through the columns, since one column is always ‘dark’ to allow for the reverse bias and read operations. Currently my microcontroller can scan my 3×3 array at a rate of 27kHz, which gives me a WIDE margin, since anything over 70 hz is practically impreceivable.

There are some flaws I need to sort out, mainly power related. The 595 can source 35mA and sink 75mA. 35mA is fine for a 3×3 array, but it won’t cut it for anything much larger. I need to find a way to increase the current handling abilities of each port, without a huge component count or complexity. If I build an array with 10 rows, each column needs to source 200 mA of current. But it also needs to retain the ability to sink a small amount of current. I figure I can solve this with a pair of transistors, one small npn for sinking, one larger pnp for sourcing.

Secondly, my microcontroller can source 25mA of current which is more than enough to reverse bias an led quickly, but it can only sink 35mA of current. So, when sinking a row that may be 16 or more columns long (at 20mA per led), some serious power handling capacity comes into play here. A simple TO92 mosfet can sink an amp of current without breaking a sweat, but I also need the ability to source current and the ability to go “high-z” to allow the microcontrollers internal circuitry to do the A2D sampling.

I think I am close to lickin this issue. More to come.

More LEDs, Less SLAVEs

Well, I’m having a some code-writers-block on applying data from the array to anything usefull… so I’m looking at ways to get more data from fewer and cheaper microcontrollers.

The cornerstone of led sensing is tristate logic. The PIC microcontroller can set each of its pins to high, low or neither (high-z). This is what allows me to forward bias, reverse bias and then sample the led. However, doing all of this requires a large number of pins on the PIC. Two pins are required for each LED. That’s why I did all this work on networking pics on a shared bus… but the cost of pics is pretty extreme, so I’m wondering about alternate ways of accomplishing the same.

Enter low-cost analog and logic interface ICs. There is a device called the 74HC573 octal tristate latching buffer. Basicly its a chip with 8 outputs, which can be high, low or high-z — same as the PIC. I really don’t care about the number of outputs, I plan to use a pair of them in an all or nothing configuration… tie all the data input lines together with a single PIC pin. I also probably won’t need the latching ability, but the 573 was cheaper than the 244 which is an octal driver without latching. So, the pic can control 16 led anodes with 1 pin – thats some awesome savings right there! 🙂 Next comes the cathode side, which is what the PIC reads with the ADC. For driving the cathodes, I plan to use the same configuration as the anodes, with the exception that I’ll also use the output enable line on the 573, to put the outputs into high-z just before sampling. All this leaves is the actual sampling. I’ll do this with a 16 to 1 analog multiplexer. The mux has a pretty high RDS(ON), something like 180 Ω … which is actually pretty close to the 150 Ω I’m using now. I figure I can put my resistor on the cathode side, after the mux connection, so when the cathode side driver is in high-z mode, my current limiting resistor disappears. In order to keep the array bright and eliminate any humans from seeing flickering, I’ll flash the entire row before sampling each LED. This should also give me the best conversion resolution on my leds, since the sampling time needs to be so high, I wouldn’t be able to read them all before their values changed.

By my calculations, scribbling in notepad, I figure I’ll need nine lines from the pic to control 32 LED lines (anodes and cathodes for 16 leds). Which is great, since I can use the lower-priced 18pin PICs… and it also sets the default row size to 16, up from the current 10. Of course, there’s no reason I’d need to do the full 16, but its good to have options! For the cost of one more pin from the pic (still easily within the 18 pin range), I could add another 16:1 mux, and lay 32 leds on a single pic! With the pic able to source and sink at least 25mA; it should be able to drive a ton of 74HC573s, which according to the datasheet need 1μA of input current per data line. Muhahahah! I’m not sure how many LEDs each PIC can handle and still have enough time to get a few complete collections inbetween servicing i2c interrupt requests with a 400 or 1000 khz bus clock.

LED Sensors III

After stuggling in the mud for the past week or so with compiler issues, I’ve finally broken free!

I have a newly configured breadboard, with enough room for four slave ICs, each handling ten LEDs. I haven’t found a decent way to create more than a double row of leds, given the way a breadboard is laid out electrically. I fear I’ll be making some PCBs for this endeavour shortly.

I’ve come up with a neat bit of code to set the address on my slaves, using a single pin. With one pin, I can actually set up to 127 different addresses, however I’ve got it capped at 16 for now. A buddy of mine suggested the idea of using diodes as or gates, for reading a bit shifted across the 8-bit port on the pic. So with between 0 and 4 diodes as a mutliple input single output OR gate, I can read any binary number between 0 and 15 (0000 to 1111) with a single pin, which happens to be the only one left!

I’ve also found the hundreds of cheap’o LEDs I ordered from a popular auction site aren’t well suited to this application. I believe this is because of their tight lense angle of 20°. The leds I was using prior to this had an angle of 45° and I’m now using heavy-duty piranha leds with an angle of 70°. I’m going to look into getting more of the 45 deg leds, I think that angle offers the best combination of a focused upward beam but still allowing enough off-axis light back in.

I think now that I have the sensors returning data the way I want, I need to work on applications to interpret that data and do something useful with it.

As soon as I remember to recharge my camera battery, I’ll have some more pictures.

Stuck in the mud

Just wanted to write up a quick update on my bi-directional LED project.

I’ve switched to a more ‘fitting’ microcontroller, the pic16f737, which has eleven ADC ports on it, although i’m only able to use ten.

after scaling up my code from four adc to ten adc inputs, and changing a few other things around, I compiled the code for the 737, and loaded it on. The 737 isn’t as nice as the 876a, the biggest drawback is it cannot self-program. Which means I have to use an eeprom programmer every time I want to update the firmware, instead of just flashing the firmware update serially.

Of course, the program initializes OK, but is not sending the data. I’m not sure if it is not reading the data correctly from the ADCs, not passing it into the transmit buffer, or not timing the transmits correctly. Whatever the case, I need to debug. This is where my current problem comes into play. I cannot get any useful data out of the hardware serial port, regardless of how slow a baud rate I choose. It appears to be a problem with my compiler and a recent update. I’m currently exploring that over on another forum.

Needless to say, once I get my debugging output fixed, I’ll be able to quickly (i hope) identify the source of the no-data problem, and be on my way to building a very large led array.

LED Sensors II

Having spent only a few hours cooking up the first vb app to talk to my array, I shouldn’t be surprised that its performance was rather lack luster, not to mention the wiggly lines on the bar graph although visually stimulating really offered nothing in terms of interpretation.

visual basic led sensor data analysis

Here is a view of the new application… I’ve re-designed a good deal of the internals, and changed the graph around so it represents more clearly the data being received from the array. Each row in the bargraph represents a row in the array, and the height of each bar indicates the amount of light the sensor is receiving.

So as I interact with the array, the bars follow along.

LED Sensors

Things are moving along … With my new understanding of I2C master/slave communications, I’ve started work on larger arrays and finding the best way to manage the array and communicate the data to the host PC.

led sensor array breadboard microcontroller pic

Above is the latest iteration of the project… and here is a lengthy description of what you’re seeing:

Along the top row you see six ICs, from left to right they are:

(hehe, I bet you’re thinking, I only see four ICs … well, there are six, trust me)

#1
Power Supply – 7805 – This is a regulated 5 volt power supply, with some filter caps, buffering caps and a power-on led. The 7805 is infact an integerated circuit, just disguised as a transistor.

#2
“SlaveA” – PIC16F876A – This is one of my slave microcontrollers … it autonomously scans its row (the bottom row) in the array with blistering speed, approx 500 uSec per pixel in the array, so 2 mSec total – which is kind of slow actually, as I add more lights to the array, the responsiveness of the array grows … I can probably shorten my sample time now. The blue LED indicates the slave is operational and the program is running.

#3
“SlaveB” – PIC16F876A – This is the second slave microcontroller, which scans the top row of leds. It is running the same program as SlaveA, but with a different slave address.

#4
“Master” – PIC18F252 – This is the third microcontroller, playing the master roll. It polls the slaves every 100msec for an update, and feeds that data to the host PC. This microcontroller is severe overkill for the job its doing, but these are the PICs i had on hand, so thats how the chips fell (har har har). The blue led indicates the master is polling a slave (in real-time, the led blinks very fast)

#5
“Clock” – DS1065T-060 – This is a digital clock generator from Dallas. It is programmed to generate any clock frequency I want, currently provideing a 20mHz clock that is used by all three pics. Although not as accurate as a crystal, it does provide better temperature stability … the only reason I am using it is to save board space (and the fact I obtained a sample of one from Maxim a long time ago but never used it) … three separate crystals and their associated load capacitors would have taken up way too much board space. The DS1065 is the first TO-92 package (on the left). Next to it is a regular 2n2222 transistor which controls the MCLR (reset) line on the slaves)

#6
“Interface” – MAX233 – This is a Maxim RS232 line driver IC … The MAX233 is very similar to the popular MAX232 except it requires no external capacitors for its voltage doubler circuit, again to save board space. This chip boosts the cmos level serial data from the “master” pic to TTL level for transmission to the host pc.

Operation of the slaves:

Each slave normally runs in a infinite loop, sampling the LED sensors as fast as it can and storing their values in a memory buffer. When a polling request is received from the master, an interrupt is generated which branches out of the sampling loop. I2C commands are pretty complex on paper, but merely a matter of setting and clearing bits in the digital world, so at 20mHz the pic handles them with lightning speed. Here is the blow by blow of the most complex series of commands, a multi-byte read

1) Master sets a “start condition” which basicly places a certain state on the bus

2) Master sends the slave address onto the bus with the read flag cleared… a slave address is the seven most significant bits of a byte (7:1), with the least signifcant bit (0) reserved for a read flag.

3) The I2C hardware in the slaves simultaniously receive this address, and compare it to their internally programmed addresses. The slave matching the address then sends an acknowledge bit on the bus.

4) Master receives the acknowledge bit and sends a command byte. Since the start condition is still present, the last slave addressed acknowledges receipt of the byte by sending an ack bit. This command byte is $04 in my application.

5) Slave receives the command, executes it and sends an acknowledge. The command $04 tells the slave to copy the ADC buffer to the transmit buffer.

5) Master receives the ack and sets a “restart condition”, which causes all the slaves to actively watch the bus for a slave address.

6) Master sends the slave address this time with the read flag set.

7) Slave matching the address sends an acknowledge. It then sends the first byte of the transmit buffer, without further prompting from the master.

8) Master receives the first data byte, and stores it in the receive buffer. The master sends an acknowledge.

9) The slave last addressed (since bus state is still START) sends the second byte in its transmit buffer.

10) Master receives the byte, stores it in its buffer, and sends an ack.

11) steps 9 and 10 repeat until the master sends an NACK and sets the bus state to STOP. This tells the slave to stop sending bytes.

each of these steps takes a tiny fraction of a second … the entire transaction is comprised of a multitude of commands and data going both ways and is finished in the blink of an eye, indicated by a fast flashing of the masters’ status led, which blinks twice (once for each slave), but the blinking repeats so fast, it looks as if the led is solid on.

If you’ve made it this far, congrats!

It is interesting to point out (not that I’ve seen any evidence of it on the host pc), that there is some lag introduced by the i2c routines in the ADC sampling process. Since i2c transactions are not just simple “one shot” commands, the slave is continuing to do ADC sampling while waiting for the next event from the master. This is acheived through the use of interrupts. whenever the slave is in the ADC loop, it gets pulled out to talk to the master, but since each time it talks to the master is only a very brief instant, its spending 99% of its time in the ADC loop. however, by me copying the ADC buffers to a transmit buffer only once during a transaction, the data in the buffer is ‘stale’ by the time it gets requested by the master. I’m going to look into ways of directly interfacing the i2c routines with the ADC buffers, which should let the master receive the freshest data possible. The problem here is, the ADC buffer is eight double-byte (word) values (only which four are actually used) but the transmit buffer is sixteen single-byte values, since the i2c protocol deals strictly with bytes. so the command to copy the adc buffer actually breaks the words into bytes to store in the transmit buffer. If I wanted to use the array to detect fast moving objects this would be important, but it responds to human interaction quite nicely now, even with the 100msec sampling delay imposed by visual basic. I think is due to the fact that the ‘missed’ samples are discarded instead of buffered, so the PC is still receiving real-time data from the array, just not very fast.

A fresh order of more LEDs has arrived, so I’ll be building up a much larger led array.

Bi-directional LEDs II

Things are going well.

For a small prototype, everything is working as it should. I have a 2×2 array of LEDs (4 LEDs total).

I’ve managed to work the sampling time down into the sub-visible range, so you don’t notice any flicker at all from the leds.

I got my visual basic program working well, providing a real time graph of what the sensors are reading.

Right now I’m trying to figure out the best way to scale up this project, into at least a 8×8 array.

Anyway, here’s some pictures:

led sensor array breadboard

There are my four led sensors … the light from the additional leds has really improved the dynamic response of the sensors, they can actually see my fingertips now, before my fingers would barely register.

visual basic led sensor array readout

This is a quick program (hah, quick = 6+ hours) I wrote in visual basic. It receives serial data from the microcontroller that manages the sensor array, and displays it on the line graph. You can see the variations in the sensors caused by me running my finger around the array.