Single Character LED SIGN

We’ve all seen the various sites where someone put a massive led sign online, and they let people abuse it. What I’ve managed to build is a “single character” led sign. I don’t know if I’ll be able to get my sign online, but I’ll take a stab at it.

After wasting a lot of time to convert a font table I borrowed from somewhere, my little sign finally had a built in character generator. It can generate any of the printable original ascii characters (dec 32 to 127), and display them on the matrix. Data feeds into the sign at 4800 baud (I think i mentioned 19200 earlier – way too fast), and is displayed on the matrix for a few seconds.

If the display sits idle for too long, a basic screen saver (screen waster?) kicks in, and does a simple animation. Any received characters replace the animation and reset the screen saver timeout.

Although exposed, I haven’t implemented the i2c interface yet. This pc board has some issues, and is too large. I don’t like the connectors sticking out to the side like that, so it’s back to the cad package to try and re-arrange things a bit. I think I will fork this design into two separate paths. One async serial (rs232), and one sync serial (i2c / spi). The sync version would be used as a display for other projects. The async version would be hooked up to a PC, and programmed with a simple message. Once detached, the display would just repeat the message over and over. One problem I ran into is storage. I had hoped to store text strings and the font table in eeprom, but the processor I chose, the 16f737 has no on-board eeprom. So instead, the font table is stored in the flash program space along with a few short text strings. The next revision(s) of the board will include a spot for a so8 ‘seeprom’ for extra storage.

LED Matrix Backpack

I had purchased some huge (2″) 5×7 matrix a while ago, as part of my led sensor research. They’ve basically been banging around the lab since, getting pins bent and such. So this past weekend, I decided to put them to some other use. Their pin layout is sort of weird, it doesn’t match up with a breadboard at all (one of the reasons they never made it into the led research). So, I decided to make up some back-packs for them, or is it a carrier board? Anyway, the board features one 5×7 matrix, one pic 16f737, a few transistors and some data connectors. The board provides two means of serial communication; asynchronous rs232 at 19200 bps, or synchronous i2c at 100kbps. A second connector provides power and ICSP pins.

5x7 led matrix backpack

This project has no practical application as of yet. The main reason I made it was to improve on my double-sided pcb fab techniques. This time I found using point to point traces instead of a large “pour” made things work a lot smoother. I used the ‘sandwich’ method with press ‘n’ peel blue. Roughly 1.5 min per side.

5x7 serial led matrix backpack

One thing I had to keep in mind while doing this layout was accessibility to solder both sides, since I can’t through plate my own vias. So things had to be laid down in specific order. I soldered the vias first, using some cheap resistors with very fine leads as my conductors. The method involved sticking the resistor into the via, with just a bit poking out the other side, then bending the resistor 90 degrees and holding it to the board. Then a quick dab of solder onto each joint set them in place. Next, straighten out the resistor leads, and trim them off. Another quick few dabs with the soldering iron and each one was fully connected. Next came the smt parts. The switches were rather easy, but those blasted little 0603 capacitors always give me grief. I tin both pads, then apply a bit more flux as “glue”, then try to reheat one of the pads, to reflow the solder onto the part. It works great with 0805 and larger parts, but the little 0603 usually gets sucked onto the tip of the iron by the surface tension of the solder.

One hard choice I had to make was whether to solder the chip straight into the board, or use a socket. I opted for a socket, which meant a harder time soldering the “top” layer. Luckily, I was able to dig up some 14 pin machine pin sockets, and thanks to the machine pin itself, they stand proud of the board a little, just enough to sneak in with the soldering iron.

For whatever reason, I decided to solder the led display next, leaving the connectors for last. I partly wanted to see which side of the board the connectors would look better on… I think next revision, they’re going on the bottom. During assembly of the connectors, I nicked the display a couple times with the iron, oh well!

Right now, the display is flashing my initials. Oh, here is the schematic, nothing exciting really!

quick video:

MintLite Part I – Continued

The huge size of my previous pcb layout kept bugging me … it was about 1.3×1.2″ and would have consumed more than half of the mint tin space! So, I spent few hours coming up with something a little more compact.

This second layout is more compact, but still a bit on the large size; measuring 1.2×0.9″. I won’t be able to make it much smaller, without going double sided, and thats just not something that’s easy to do at home.

I’m not sure what happened to the weekend, but it’s almost over, and I haven’t even dusted off a breadboard yet. Oh well!

MintLite Part I

MintLite – The Luxeon Powered Mint Tin Flashlight!

This idea has been rattling around in my head for more than a month now, and I finally have thought it out enough to do some doodling in Eagle. The basic idea is built around a six watt Luxeon K2. I plan to use a pair of 2.5aH lithium batteries to provide approximately eighteen watt-hours of power. The Luxeon will be controlled by a microcontroller, providing different brightness levels, as well as protecting the luxeon from excessive current when the batteries are fully charged. The microcontroller will also monitor the battery voltage; dimming the light as needed and eventually shutting down completely to prevent over-discharge. The light will contain it’s own battery charger, powered by USB using the MAX1811. The MAX1811 will charge a single lithium cell (or cells in parallel) at up to 500mA off a self-powered USB port. The 1811 allows charging from a bus-powered port as well, but for sake of simplicity, I will ignore that option.

mintlite schematic diagram luxeon max1811 pic microcontroller

The circuit keeps things fairly simple. Switch Q1 provides pwm control of the luxeon. Header SW1 will connect to some sort of switch, for turning the light on and off, and changing brightness. The MAX1811, IC2, takes 4.3 to 6.5 volts as input, and regulates it to 4.2 volts for charging the lithium cells. Charging status is indicated by LED2, which will light when the charger is in bulk charging mode (current mode).The microcontroller, IC1, is a PIC12F683. The 683 provides a lot of bells and whistles for such a small chip. I will be using analog input 0 to monitor the battery voltage. General purpose input 2 will monitor the charging status, perhaps to disable charging when the batteries are in bulk charging mode. General purpose input 4 will use an internal pull-up resistor to monitor the switch. General purpose output 5 is controlling a mosfet transistor responsible for PWM of the led.

The pcb layout is in it’s early stages, and designed mainly around parts I have on hand. I don’t think I’ll actually prototype this PCB, since it’s much too large, and the wrong shape. Whether it gets printed or not, it was fun to draw. There are two main things I want to change. First the FET (Q1) in the TO252 package is rated at something like sixty amps – way more than I need for this project. ON Semiconductor has some nice SOT23 fets rated at 4 amps that should fit the bill nicely, and save a lot of space. Secondly, I need to find a smt version of the usb connector, perhaps a mini usb instead.

Hopefully this weekend I’ll be able to breadboard this circuit and see how it all goes together. Stay tuned for “Part II”.

RS232 Utilitarian Project

If necessity is the mother of invention, being cheap must be like a step-father or uncle or something?

I needed some level shifters / line drivers that I could easily use on the breadboard for microcontroller projects. Rather than give some other entrepreneur $10 for their version, I made my own.

MAX232 rs232 line driver level shifter

Nothing particularly special here, aside from the cool factor added by the two LEDs which light on RX/TX events. The chip is a standard MAX232 clone, and I’ve got five 1uF ceramic caps mounted on the back side. The leds are driven by some SOT-23 transistors. To make things simple, I stuck the pin header through the board the “wrong way” and forced the pins almost all the way through their plastic spacer / retainer. This way the unit plugs right into the breadboard, and lays there real nice, even with a heavy serial cable attached.

MAX232 rs232 line driver level shifter

So far so good, it works well with my bootloader at 115kbps, so I figure that’s good enough!

EDIT: Eagle SCH and BRD files available here (7-zip format).

Touch Sensing Building Blocks I

The “core” building-block I mentioned in my last post is nearing completion, at least, the software.

I have my microcontroller handling “switch emulation” tasks. It can emulate either group of momentary switches or a group of toggle switches. Response time is real good in a dimly lit room, and it works decently well even with the overhead fluorescents turned on.

Right now I’m working on a basic keypad PCB I can throw together, for a ‘proof of concept’ prototype. The first keypads will likely only support 6 keys, and I’ll build from there. Six keys requires twelve LEDs, six of them need direct and discrete anode and cathode connection to the microcontroller. The other six LEDs are providing bias light for the sensors to “see”.

I should have a video up tomorrow of the breadboard in action, and hopefully some pcb’s by next weekend.

LEDs As Sensors: Revisted

Thanks to the folks at Make: and Hack A Day, my research into the area of using LEDs as sensors has been receiving a lot of attention. With this attention comes questions. I like receiving questions. Only thing I don’t like about answering questions in the e-mail is the knowledge is locked up. Sure I could repost the e-mails, but it is sometimes difficult to follow the context after the thought train has left the station. With my rekindled interest, I wanted to take a short moment and summarize a few things.

These are just my opinions – and I welcome debate and feedback on them – I especially welcome anyone to be challenged by them enough to prove me wrong. LEDs as Sensors offer at least two avenues of usefulness; communications and interface. I haven’t dipped even a toe into the communications side of the pool – all my work has been on interface.

These are the applications I feel LED Sensors are a poor fit to replace:
#1 – The touchpad on your notebook. Seriously, no one but a geek would enjoy having 128 or more bright LEDs glowing continuously to replace the little capacitive discharge pad that is used 95% of the time today.

#2 – The keys on your keyboard. LED sensors are pretty slow, even a modest typist would be hindered by the response time.

#3 – Any application that needs to work outdoors. LEDs and the Sun do not get along.

These are the application I feel LED Sensors may work well in:
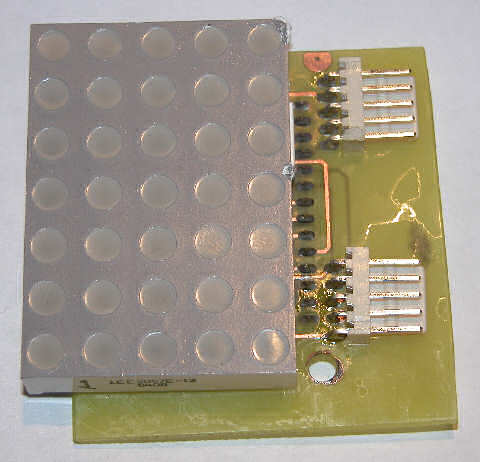
#1 – Keypads and interactive displays used for Art and Music. These applications fit the ostentatious nature of the interface, where the controls are as much a work of art as a functional device.

Yep, that is it… that is the only application I think LED Sensors offer any strength in.
Here is an example – Musician / DJ sound effects tablet:

Imagine a thin tablet like device, glowing brightly with powerful LEDs in an otherwise darkened club / dance hall / etc. The tablet accepts an ordinary 8×11 sheet of transparency film. Printed on the film are the names of pre-programmed effects / samples /whatever. Under the film, evenly spaced trios of LEDs are used to detect the presence of a reflective object. The tablet connects into the rest of your system using regular MIDI or whatever other interface one can think of. This tablet is no different than boxes hobbyists and musicians have been building or buying for years, except, the mechanical switches have been replaced with eye catching LEDs.

Here are a few other questions that have been raised:

Q: Do I have to use red LEDs?
A: No, technically any LED color works. Red is the cheapest and that is what I use. Along with yellow, red is almost the most sensitive.

Q: I tried IR LEDs and they seem very sensitive, why not use those?
A: The point of using LEDs as Sensors is to have an ostentatious interface. It’s not going to be very showy if the light is invisible. If you want to use infrared LEDs, use one emitter and one photodiode / phototransistor – it is a LOT easier.

Q: Does this work with organic / flexible LED displays?
A: I have no idea. Those displays are largely theoretical and prototypical in nature – maybe in five years when I can buy one for a few dollars, I’ll experiment with it. The organic compounds used to manufacturer these displays also have big problems with humidity and overall short lifespan – neither are very positive traits.

Q: Can you send me your ASM code for such and such?
A: No, no I can’t. I do not have any ASM code – I do not know how to program in assembler. I have code written in Proton Basic, which I will happily share.

Q: I want to get started with microcontrollers?!
A: Excellent – I’m not going to help you. There is a huge learning curve involved – a lot of it can be skipped by spending money (on proton basic). Check out www.sparkfun.com and www.crownhill.co.uk for good microcontroller stuff. Check out google.com for tons of info on learning microcontrollers.

Q: What microcontroller do you recommend?
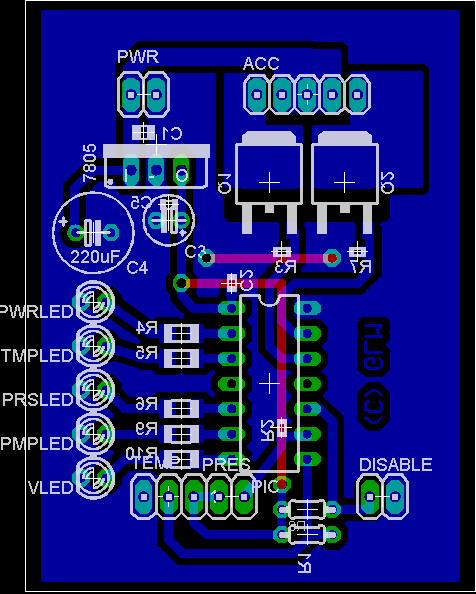
A: I like the new PIC16F690 family from Microchip. It is a small inexpensive package that offers many features only found on larger processors (like dedicated i2c hardware). It also sports at least 10 ADC ports.

——

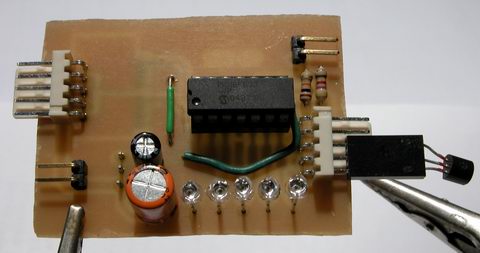
In closing, I would also like to share some basic info on what I’m working on at the moment. My current project is to get a stand alone system worked out for emulating mechanical switches. I consider this a valuable “core” building block behind the technology. I have momentary switches partly working, after that, a toggle switch shouldn’t be much harder. As a future goal, I would like to get “cores” built to emulate sliders and knobs. Those three elements should cover a great deal of the artistic / musical needs that I feel this technology is well suited for.

Thank you for visiting and I welcome your comments. My gmail is gordonthree – feel free to contact me about anything.

Water Filter Controller

The old adage “measure twice, cut once” has a realitve in the field of electronics engineering; “measure twice, design once” … ok, well maybe that’s a bit corny but anyway.

Turns out the controller I designed for my water filter is pretty much useles. My filter’s pump is not the 12vdc that I imagined it to be, instead, it is 24vac. So the two smt mosfets which I soldered to my pcb with generous amounts of solder, are not capable of switching AC. Worse, I had planned to power the controller itself off the psu for the pump, so the 7805 vreg I’m using will not appericate AC on its input terminals either.

I plan to salvage this situation however… using relays, either mechanical or electronic, as well as a separate power supply. So, I will use a ~12 volt unregulated supply to power a pair of mechanical relays, one for the pump, one for the valve, which in turn will be switched by the mosfets. Or, I can desolder / destroy / jumper over the mosfets, and run a +5v control signal to my outputs, for control of a solid state relay.

I need to price out the cost of mechanical vs solid state …. probably solid state will win, I think I can build a triac based ssr for under $2.

Water Filter Controller

As a fan of taking my dihydrogen monoxide in straight, uncut, uncorrupted liquid form, I purchased a six stage reverse osmosis filter some years ago.

My filter is a few years old now, and the super calcium enriched water we have in Michigan has taken its toll. The filter used to shut off when the production tank was full. However, the filter has recently developed a leak in the auto shutoff valve, so it’s constantly consuming water, even if the pressure tank can’t hold any more. This leak started slow, and I could live with it. In a few months, it had sped up to wasting a considerable amount of water. So, rather than replace the auto shutoff valve, which would have been too easy, I decided to add a microcontroller instead. The other problem my filter has, I discharge the brine water out to storage tanks next to my house, which hold the waste water, for watering plants and other uses. Problem is, when the temperature gets too low, the discharge line can freeze, which is very bad for the filter. So my microcontroller solves this problem as well.

The mcu is performing a few simple logic operations, with a few twists. First, it checks to see if the pressure tank reads “high” or “low”, via a pressure sensitive switch. If the tank reads “low”, that is the first “1” in my logic comparison – a simple AND operation. Second, the mcu checks to see if the outdoor ambient is above 38°F. That is my second “1” in the AND operation. If the pressure is low and the temp is good, a flag is set to enable the boost pump and water supply valve. A timer detects this flag and begins a countdown of 30 seconds (roughly). I chose to use a timer to buffer any false readings that may occur for whatever reason. After the 30 seconds has elapsed, the mcu turns on two mosfet switches, controlling the current for a solenoid valve and the boost pump. The mcu continues to monitor the two variables of the AND operation, if either changes, the “make water” flag is cleared, and the mcu turns off the water supply valve and the boost pump.

schematic diagram of water filter controller
(click for super-sized version)

Two N-Channel mosfets control the current for the boost pump and the solenoid valve. The valve is a 24VAC lawn sprinkler valve, but I have tested it and it works well on 12vdc. The boost pump is a 100 gpd, 100 psi diaphragm pump, which delivers slow but steady high pressure water for optimal membrane operation. Pull-down resistors R3 and R7 are provided to prevent mosfet self-destruction should something happen to the microcontroller. The connectors TEMP, PRES and DISABLE are pin headers for connecting to external transducers. For reading temperatures, I chose the Dallas DS18B20 high precision digital thermometer with 1-Wire interface. The pressure switch is a simple normally closed pressure sensitive switch that opens around 45 psi. It is wired to present the PIC with a logical “1” when the pressure is low. The disable connector will be connected to a shut-off switch, allowing me to temporarily halt production. The LEDs are just for indication of various operational conditions and modes. A 7805 regulator provides the pic with 5v from the 12v supply for the pump and valve.

water filter controller assembled top view

Rather than cobble this together on protoboard, I made up some PCBs real quick. Here is a top view of the controller, without any connections, except for the thermometer. When installed, the thermometer will be installed at the end of a ~10ft shielded cable, for sensing the ambient temperature near my water storage tanks.

water filter controller assembled bottom view

Here is the messy solder side of my controller. I haven’t hosed it down with alcohol yet to clean off the flux. I waited till it was good and late before soldering anything, so some of those joints are pretty nasty – I apologize.

water filter controller pcb layout
(click to download full res)

The PCB layout was pretty easy – I had a lot of room to work with, as the enclosure I have selected is pretty big. This image shows the parts layout, along with the bottom copper artwork. The top layer artwork (in red) is for two jumper wires. Clicking on the above layout will get you a 300 DPI monochrome TIFF of the bottom layer artwork. Print this out at 300DPI and you should have a 1:1 scale of the pcb, incase anyone wants to make their own. Hit the contact justDIY link on the side menu if you want the firmware source code – it is written in Proton Plus basic.

Matrices as Sensors

This idea was shared with me on the electro-tech-online forums, and I made up some graphics to help myself and others understand it.

step one
The first step involves choosing your illuminator LED – this diode will provide light for nearby sensors to ‘see’.

step two
The second step is to reverse bias a nearby LED, preparing it to be the sensor. A diode in an adjacent row and column must be selected, to avoid electrical interference from the illuminator.

step three
The third step is reading the voltage present on the cathode terminal of the diode, which indicates the light level the sensor detected.

step four
The controller can then choose another nearby diode to use as a sensor, or move on to another pixel in the array, repeating the entire process.